 |
| Chunky 18 ct gold wedding bands |
I got engaged yesterday. I say yesterday because that is what it seems like in my mind. In fact it was 20 years ago this past Christmas.
My theory was always that an engagement only need last as long as it took to find the dress, venue, the perfect wedding rings and print the invitations. Some of these things took considerably longer than others. In this modern age, you can pull the whole thing together rather quickly. For us, one of the hardest items on that list was the wedding ring.
Ultimately, we found the perfect wedding ring for my husband, but I never really found the one that spoke to me. Maybe that was because in my heart of hearts I wanted to make my own ring. I did have a simple band to wear on the day we were married, but honestly, I have never really worn it. Instead, I have been on a quest to make the ring that I wish I was able to find when we were working through our "Wedding To Do List".
This February I am launching my new collection of wedding rings for men and women. Most options are completely unisex and appeal equally to all. Each ring has a lovely slightly irregular feel to it, as if it was dug up in an archaeological find. The shape makes them feel really comfortable, as well as having a presence and appeal. You can purchase these rings through my Etsy Shop or, if you live in London, you can buy them directly from me.
 |
| This aquamarine platform ring makes a wonderful alternative engagement ring |
All of my rings are fully hallmarked through the London Assay Office, assuring that you get exactly what you purchase. Rings are available in silver, yellow, red or white gold, platinum or palladium. Click on the picture to be directed to my shop where you can find details about the dimensions and costs. If you like the overall style, but can't find exactly what you are after, I would love to work with you to make the ring of your dreams. Email me at michele@wyckoffsmith.com.
Modern Stacking Rings: Introduced to my shop a few years ago, the Modern Stacking rings have quickly become a best-seller for the bride that wants something a bit different than a traditional wedding ring. Pictured in (top) sterling silver, (middle) 14 ct rose gold and (bottom) 14 ct yellow gold, these rings nestle together in a perfect yin and yang. They can also be purchased individually and in sets of silver.
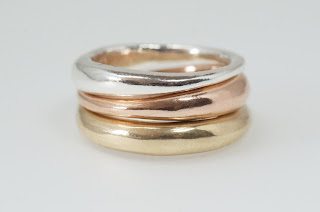 |
| Modern Stacking Rings |
Olivia: This slender organic shaped ring is brilliant stacked up in silver, gold and rose gold. It looks perfect on its own if you want a beautifully hand-crafted narrow ring or coupled with a stunning engagement ring.
 |
| Olivia |
Emma: Designed with the person who really just wants a simple, but beautiful ring to wear on its own. The ring dips and swells like life itself and is perfect for the person with a busy active lifestyle.
 |
| Emma |
Gilbert D: The soft organic shape of this ring has a D shaped profile giving it a bit more heft and presence. Originally designed for a dear friend, this ring reminds me most of a band that would be found in a Viking hoard.
 |
| Gilbert D |
Horatio: Bold, wide and full of personality, this ring is a beautiful statement of love and affection. This band looks great on bigger hands and dips and swoops in its D shape.
 |
| Horatio |
Kelp: This ring was inspired by the beautiful seaweed on the New England coast. Perfect for couples who love the seaside and want to be reminded of their coastal lifestyle.
 |
| Kelp |
A few words about the ring of your dreams. Just like life, your ring will reflect how you live. With time, your ring will wear in with dings, bumps and scratches, especially with silver and higher carat golds. But don't fret, your ring is like a historic document that reflects your path as a couple. Personally, I love the way the softer 22 ct yellow gold rings mellow with age.
 |
| Horatio and Emma rings in silver |
For more ideas of my work and to see a selection of gemstone rings, visit my website at www.wyckoffsmith.com. Alternatively, a wide selection of my work can be seen and purchased at wyckoffsmith.etsy.com.


